In this post, I intend to breakdown how object detection is done using YOLO.
Before fully understanding this hellish technological fiasta, you should know the difference in object classification, detection and segmentation.
Just stick till the end, and you won’t regret. :)
What is Object Classification
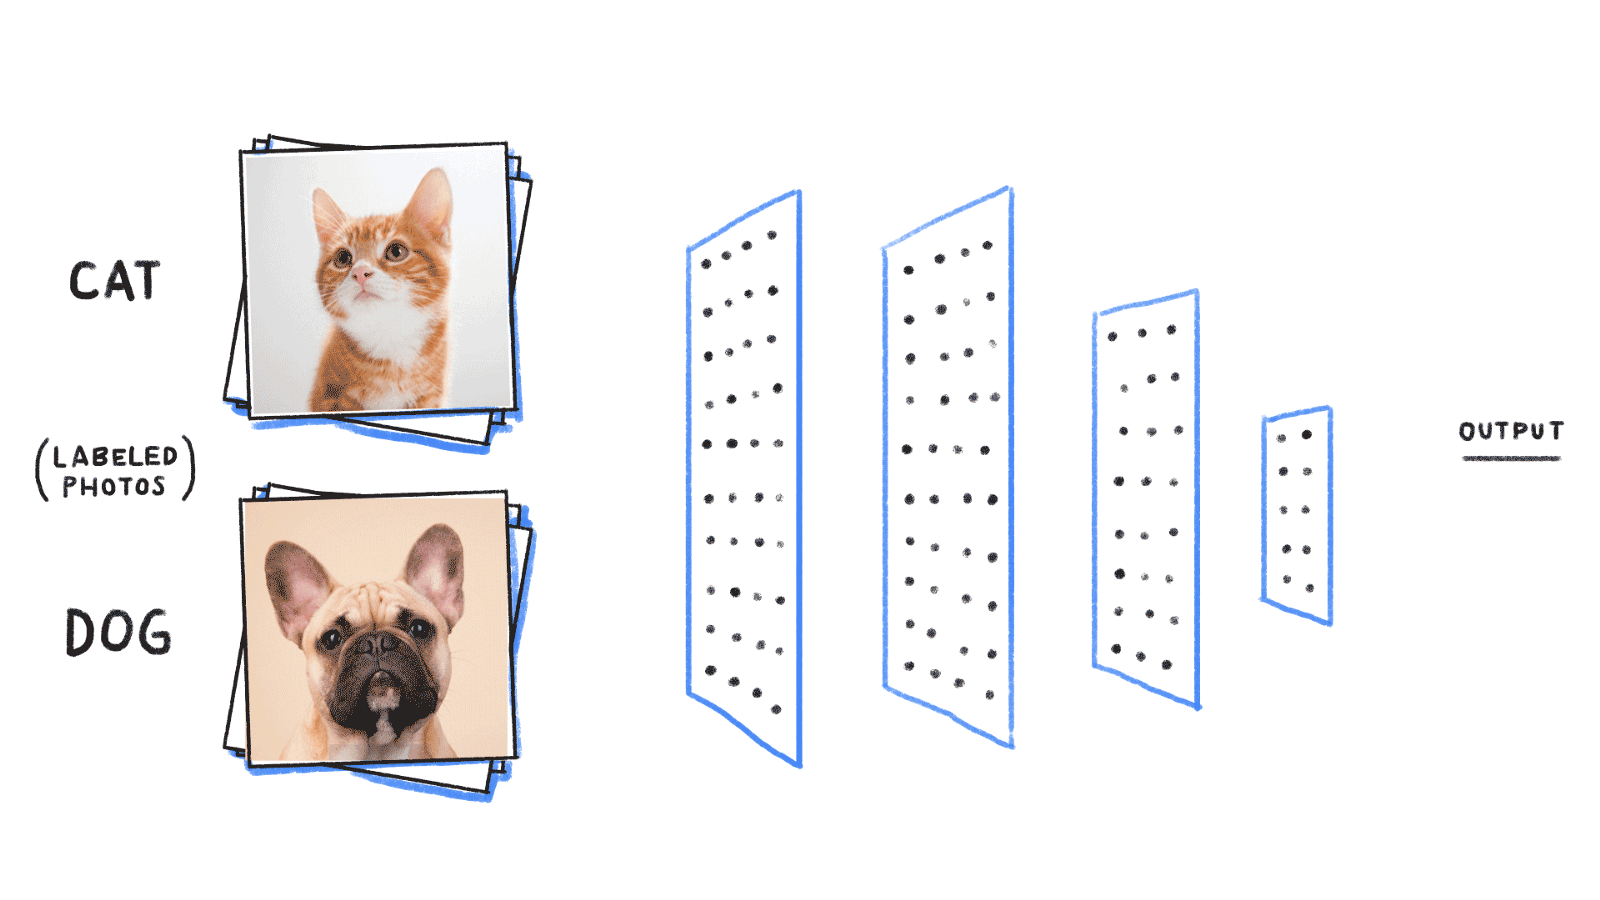
Image Reference: https://goo.gl/BPtB4f
It is a process where a system tries to predict what an image is. That is, a
classifier that predicts the label of the image.
In a simple term, if you
have a classifier for cat-dog prediction, the system (or the classifier)
predicts (tries to predict) the label of any test image fed to it. Here, it will
either be a dog or a cat.
Remember: For any classifier, it will only
predict the class label on which it was trained on. So, in the above case,
despite showing an image of an elephant, the classifier will either output dog
or a cat. To recognize the elephant, the whole system will have to be trained
from scratch (or loaded from pre-trained model) on elephants’ dataset.
Approaches for object classification:
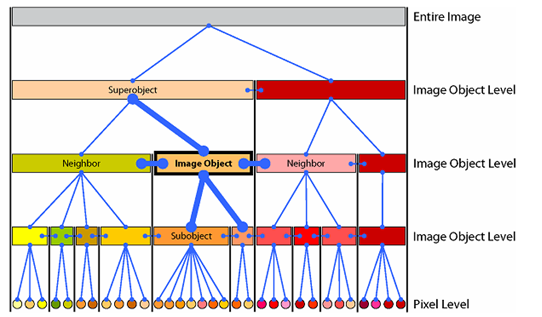
A general representation of abstract features using pixel. Bottom level consists of raw pixels. As we go up in the hierarchy, pixels are grouped together to form low level features which in turn form groups to form high-level features.
We can apply any existing ML/DL techniques for classification problem. Some of which are:
- Binary classification on image features
- SVM on image features
- Artificial Neural Networks on image features
- Convolutional Neural Networks on raw image
Among this, CNN has been proven to be one of the best architectures for image classification. To get the scale of how good CNNs are, just know that latest state of the art models in some ways incorporate CNN.
Object Detection
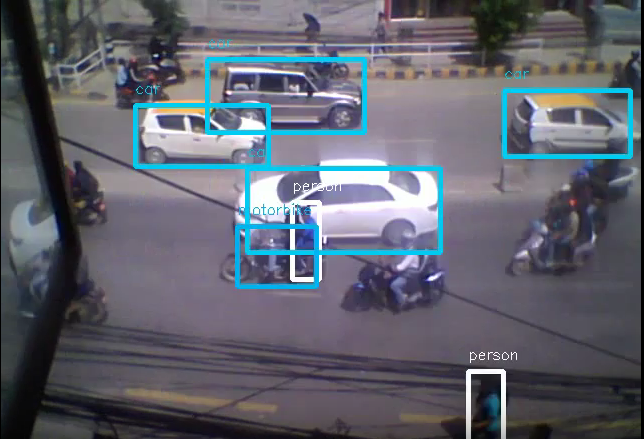
Image from YOLO V3 in MPercept Technology R&D Unit
Object detection is a computer technology related to computer vision and image processing that deals with detecting instances of semantic objects of a certain class (such as humans, buildings, or cars) in digital images and videos. Well-researched domains of object detection include face detection and pedestrian detection. Object detection has applications in many areas of computer vision, including image retrieval and video surveillance.
In a more convenient sense, it is the process of detecting every objects in the scene along with classifying their labels and finding the bounding box (or polygons) of that object.
The last section consists of latest techniques like:
- YOLO
- RetinaNet
- RCNN
- Fast-RCNN
- Faster-RCNN
- Mask RCNN
YOLO
Click Here: https://www.youtube.com/watch?v=MPU2HistivI
You Only Look Once is a state-of-the-art, real-time object detection system. It
was originally developed around 2015 that outperformed every other techniques at
that time.
YOLO has its own, neat, architecture based on CNN and anchor
boxes and is proven to be on-the-go object detection technique for widely used
problems. With the timeline, it has become faster and better with its versions
named as:
- YOLO V1
- YOLO V2
- YOLO V3
YOLO V2 is better than V1 in terms of accuracy and speed.
YOLO V3 is not
faster than V2 but is more accurate than V2.
References
The original paper can be found here.
The paper reference to YOLO V3 can be found
here which is nothing but
an incremental improvement added to V2.
How Does YOLO Work
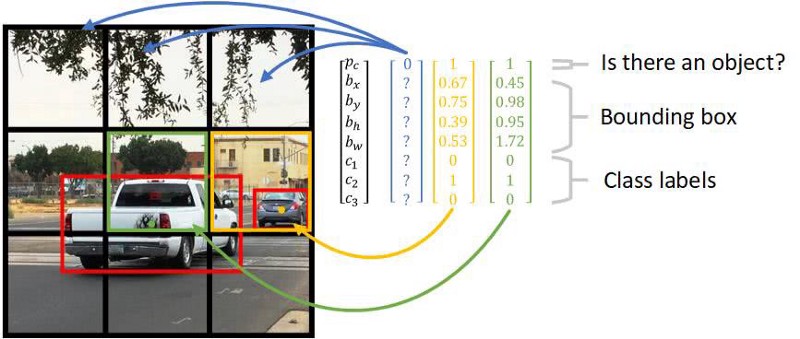
YOLO divides up the image into a grid of 13 by 13 cells: Each of these cells is responsible for predicting 5 bounding boxes. A bounding box describes the rectangle that encloses an object. YOLO also outputs a confidence score that tells us how certain it is that the predicted bounding box actually encloses some object.
Prior detection systems repurpose classifiers or localizers to perform detection. They apply the model to an image at multiple locations and scales. High scoring regions of the image are considered detections.
YOLO uses a totally different approach. It applies a single neural network to the full image. This network divides the image into regions and predicts bounding boxes and probabilities for each region. These bounding boxes are weighted by the predicted probabilities.
YOLO V3 is more accurate. Following picture depicts the overall architecture for
YOLO V3:
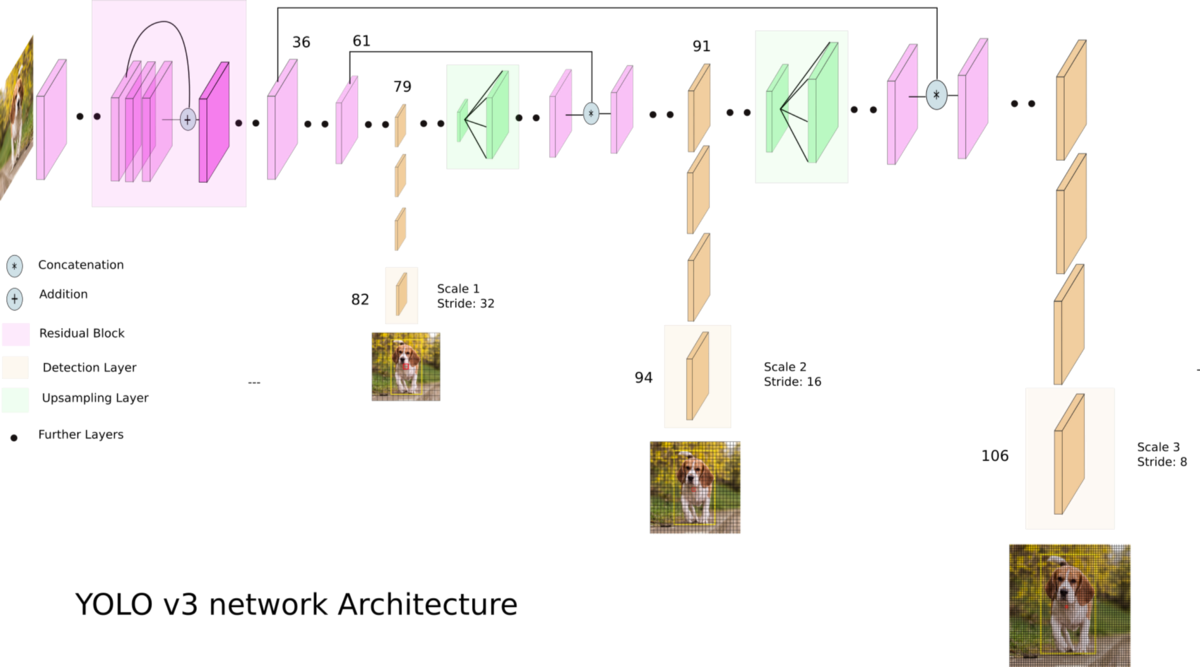
Source: https://towardsdatascience.com/yolo-v3-object-detection-53fb7d3bfe6b
Where to get YOLO
YOLO binaries (and sources) can be downloaded from following sources:
- https://pjreddie.com/darknet/yolo/
- Directly from github here
YOLO is based on darknet, built in C. Darknet is an open source neural network framework written in C and CUDA.
How to Use YOLO
I) Clone the Repository
git clone https://github.com/pjreddie/darknet
II) Compile The Source
We can directly compile the source using make. Just go the the directory where
darknet is cloned and run the command:
Remember: make makes use of the Makefile which consists of instructions to compile the C source files.
After completion of the make process, you will get a file named darknet which is a binary and executable file. You can use this binary executable to run the YOLO.
III) Make darknet Executable
While running the command ./darknet, if you are getting permission error, it
means the user does not have exeutable permission for running the binary. Just
hit the following command
chmod u+x darknet
After this, you will be able to run the darknet executable
YOLO Structure
I) Configuration Files
YOLO is entirely plug-n-play, that is you can configure YOLO to detect any type
of objects. In fact you can also modify the CNN architecture itself and play
around. YOLO does this by making use of configuration files under cfg/.
The configuration files end with .cfg extension which YOLO can parse.
These configuration files consists of mainly:
- CNN Architectures (layers and activations)
- Anchor Boxes
- Number of classes
- Learning Rate
- Optimization Technique
- input size
- probability score threshold
- batch sizes
Based on different versions, there can be many configurations from V1 to V3 to full training to tiny layers. You can download different configurations out of which following are the two:
- YOLOV3 (full): https://github.com/pjreddie/darknet/blob/master/cfg/yolov3.cfg
- Tiny YOLO V3: https://github.com/pjreddie/darknet/blob/master/cfg/yolov3-tiny.cfg
II) Weights
Each configuration has corresponding pre-trained weights. Here, only YOLO V3 is referenced.
Full Weight
To get full weights for YOLO V3, download it from
https://pjreddie.com/media/files/yolov3.weights
This is the weight trained on full 9000+ classes.
Tiny Weight
This is the weight trained on only 80 classes. You can get the weight for YOLO V3 from here https://pjreddie.com/media/files/yolov3-tiny.weights
Test YOLO
As told earlier, everything is run using darknet exeutable file.
Suppose
we have an image named test.jpeg, then we can try predicting the objects as:
./darknet detect yolov3-tiny.cfg yolov3-tiny.weights test.jpeg
Normally, .cfg are inside cfg/ directory.
Suppose, you have the
yolov3-tiny inside the directory weights/ then, the command will be:
./darknet detect cfg/yolov3-tiny.cfg weights/yolov3-tiny.weights test.jpeg
Once done, there will be an image named predictions.jpeg in the same
directory as of darknet file.
You can view the prediction classes along
with corresponding bounding boxes.
Train
The trianing is a bit more complex because we have to get things and configurations right. Following command does everything:
./darknet detector train custom/cfg/obj.data custom/cfg/tiny-yolo.cfg custom/tiny-yolo_100.weights
Training Command Breakdown
Here, .cfg and .weights are what they meant to be — configuration and weight
files as mentioned earlier.
Everything happens using the obj.data file
which has content like:
classes= 1
train  = custom/cfg/train.txt
valid  = custom/cfg/test.txt
names = obj.names
backup = backup/
obj.names
This file consists of list of class names. Example:
train.txt
This file consists of list of training images that we are going to feed into the network. The content is similar as:
custom/train-images/11.jpg
custom/train-images/12.jpg
custom/train-images/13.jpg
...
...
Here, train-images/ consists of all the training images.
Along with the images, this directory also consists of text file for bounding box corresponding to the image.
So, you will have custom/train-images/11.txt whose content can be:
0 0.32502480158730157 0.3950066137566138 0.12896825396825398 0.09523809523809523
Here the first number represents the id of class of corresponding in
obj.names.
The remaining numbers represent the bounding box. If there were multiple boxes of multiple classes, it’d be like:
0 0.32502480158730157 0.3950066137566138 0.12896825396825398 0.09523809523809523
0 0.52502480158730157 0.3950066137566138 0.12896825396825398 0.09523809523809523
1 0.32502480158730157 0.3950066137566138 0.12896825396825398 0.09523809523809523
test.txt
This file consist of list of test images.
Note: In .cfg, you have to change the number of classes to the total found in obj.names.
So, that is how you can run YOLO. Remember all the above command was tested in a Linux system. The process is similar for windows systems too.
Final Thought
I know it’s a tedious process, and the initial phase might feel like running straight into a wall, but once you make it to the end, you’ll feel great.
This was originally posted here
This article has also been published in Dzone here